Connect AI helpers
Let a helper work on your site with access you approve.
Which helpers work
Helpers that can use tools on their own work with Keel, such as Claude Code, Claude Cowork and Grok bots. A helper can bring over content, make a design and create pages.
Regular chats don’t. A chat that only replies with text can’t send requests to Keel, so it can’t connect.
Connect with a connector
Claude, ChatGPT, Grok and Grok Bot connect to Keel with one address, added as a connector in the helper: https://app.keelpage.com/mcp. Open AI helper access; the first card, Connect with a connector, shows the address with a Copy address button and short steps for each helper.
- Claude: open Settings and look for Connectors. Choose Add custom connector, name it Keel and paste the address. On a Team or Enterprise plan, an owner adds it for the organisation first; then you connect it from the same place.
- ChatGPT: custom connectors need developer mode, on a paid plan. In Settings, look for Connectors or Apps, turn on developer mode (often under Advanced), then create a connector named Keel and paste the address. On a business plan, an admin may need to allow it first.
- Grok: on grok.com, open Settings and look for Connectors. Add a custom connector named Keel and paste the address.
- Grok Bot: in its settings, look for Connectors (or MCP servers), add one named Keel and paste the address. It opens your browser for the sign-in.
You’ll sign in to Keel with an email link or a passkey, pick the site and the role, and approve with your passkey. One connection works on one site for up to 12 hours. It’s listed on AI helper access under the helper’s name, such as “Claude connector”, and the approval email names it the same way. End access stops it at once.
Site imports and custom designs
For a site import or a custom design, give your helper Keel’s site import skill or web design skill alongside the agent guide. Each skill says which Keel build it was checked against, and the connection request points to both.
Connect another helper
For any other helper, copy a connection request instead. If the menu is hidden, click Open menu first.
- Open AI helper access and click Connect an AI helper. Read Before you paste (below), then click Copy request and give the request to the helper you’re working with.
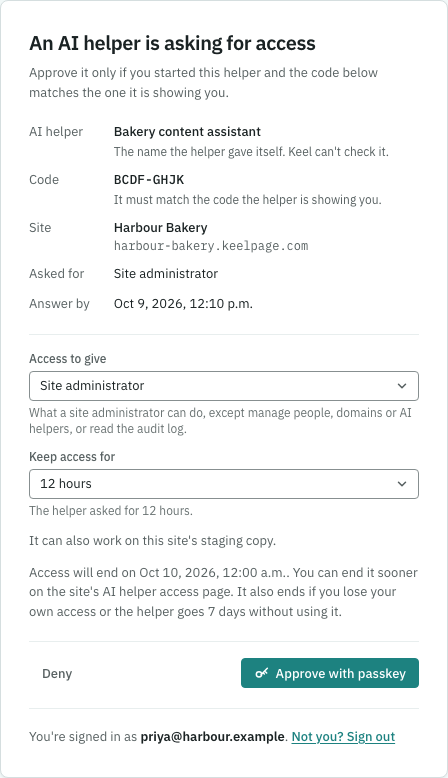
- The helper asks for access and gives you an approval link and code. Open the link. Check that you started the helper, that it names the right site and that the code matches.
- Choose Access to give and Keep access for. Click Approve with passkey and complete your device’s check. If asked, click Add a passkey first. The helper never gets more access than you have.
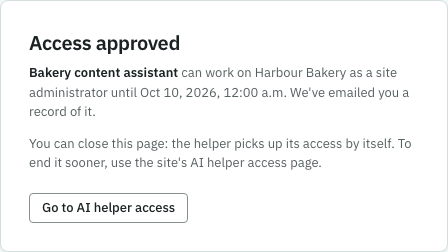
- Review its drafts and previews before agreeing to publish. Launch and domain changes stay with a person. Return to AI helper access to see the approver, end date and last use. Click End access and confirm when you want it to stop. If you lose site access, the helper loses it too.
Before you paste
Your helper needs permission to reach Keel at two addresses: app.keelpage.com, for the admin and API, and your site’s address ({slug}.keelpage.com, or its own domain once connected), where previews and links open. If they aren’t allowed, the helper can’t connect. Connect an AI helper shows both addresses for your site, each with a copy button, and the steps for each helper:
- Claude (app, desktop or web): in Settings → Capabilities (on Team or Enterprise, your organisation’s owner does this), turn on code execution and Allow network egress, then add app.keelpage.com and your site’s address (or *.keelpage.com if it’s accepted).
- Claude Code: add *.keelpage.com to sandbox.network.allowedDomains in Claude Code’s settings before you paste, or approve each Keel address when Claude Code asks. If your site has its own domain, add it the same way.
- ChatGPT and other helpers: use a mode that can send web requests, with internet access on, and allow app.keelpage.com and your site’s address. A plain chat that can only read pages can’t connect.
The request first asks the helper to check that it can reach Keel. If it can’t, it stops and tells you exactly which addresses to allow, instead of giving a general error. Allow them, then paste the request again.

If something goes wrong
If approval fails, check that the code hasn’t expired, that you have the site access the request needs, and that you’re using the device with your passkey. An ended request needs the helper to ask again. If the site allows less time than you want, choose an available duration. Don’t approve a request you didn’t start.